
Fit pull-outs everywhere and you'll maximise storage. That's the advice repeated in most showrooms, and it's wrong for a compact Chennai kitchen. A pull out for kitchen cabinets doesn't create space. It trades some of it for access, and that trade is worth it only when the access you recover beats what a drawer or fixed shelf would've held in the same width.
Judge every cabinet by four things before you order anything: width, load, cooking frequency, and what sits behind it, especially sink plumbing. Get that call right and daily cooking gets easier. Get it wrong and you've paid premium hardware money to store less, worse.
Which Pull Out Earns Its Cabinet Width
Adding more pull-outs does not add storage. That's the rule I'd start with in any compact kitchen. A narrow wire unit can swallow the exact width a drawer needs for a pressure cooker, tawa, or rice tin, and those irregular, heavy items are the ones Indian kitchens struggle to house.
Use a cabinet-by-cabinet audit instead of a catalogue wish list. The widths in the Member of Architecture modular kitchen accessories list show how specific these units are, with bottle units at about 150 to 300 mm, pantry units commonly 450 to 600 mm, and waste-bin systems at least 300 mm or up to 600 mm under a sink. Nothing about that is interchangeable. Each width you give to one job is width taken from another.
Pull-out, drawer or shelf by width and load
Option | Typical width | Load or capacity | Use it when |
|---|---|---|---|
Spice and oil pull-out | 150 to 200 mm | About 22.5 to 30 kg | Daily jars sit beside the hob |
Bottle or masala pull-out | 150 to 300 mm | About 22.5 to 30 kg | Tall bottles fill a narrow gap |
Base basket | Match a 300 to 600 mm opening | 25 to 40 kg per basket | Packets and light vessels sit in a deep base |
Pantry pull-out | 450 to 600 mm | About 50 to 60 kg | Provisions fill a tall unit |
Waste pull-out | 300 to 600 mm | About 24 to 25 litres, up to 40 litres | Wet and dry waste fit around the plumbing |
Cookware drawer | Deeper than a narrow basket | 30 to 40 kg runners | Pressure cookers, kadhai and tawa are used often |
Fixed shelf | Leftover width | Not a rated mechanism | Rare or odd-shaped items do not need daily access |
A 150 to 200 mm unit beside the hob earns its place because the job is narrow and frequent. Oils, masala jars, and small bottles line up in one or two rows, and you pull the whole set to you while tempering. Try to force that same unit to hold general provisions and it fails. The bottles tip, packets slide behind the wire, and you've lost a wider drawer for nothing.
Heavy cookware points the other way. A deeper drawer on full-extension runners carries a pressure cooker flat, with its lid and weight spread across the base. A narrow basket asks you to lift it up and out at an angle, which is harder on your wrist and harder on the runner. If you cook with a kadhai daily, frequency settles it. Put it where one straight pull brings it to waist level.
Where the sink changes the answer
Under-sink cabinets catch people out because the catalogue photo shows a clean, empty box. Your box has a waste pipe, water lines, and possibly a purifier cutting through the usable depth. A waste pull-out that fits the shutter width can still foul the trap at full extension. Measure around the plumbing first, then pick the bin size that clears it, even if that means the smaller capacity.
Practical rule: spend premium hardware money only where recovered access justifies the lost capacity. A tall pantry or deep cookware drawer earns it. A narrow spice unit beside the hob rarely needs a premium runner.
Before any hardware is ordered, walk the elevation and mark every carcass as pull-out, drawer, or fixed shelf. Don't leave a cabinet unmarked for the factory to decide. That single marking exercise, done while you review the best modular kitchen design choices for your layout, stops the common outcome where every base gets a basket because nobody chose otherwise.
Clearances That Keep a Small Kitchen Usable
Walk a cooking session through the plan in order. Fridge, sink, prep counter, hob, then back to the sink. A pull-out that works in a catalogue can block that walk the moment it's fully open.
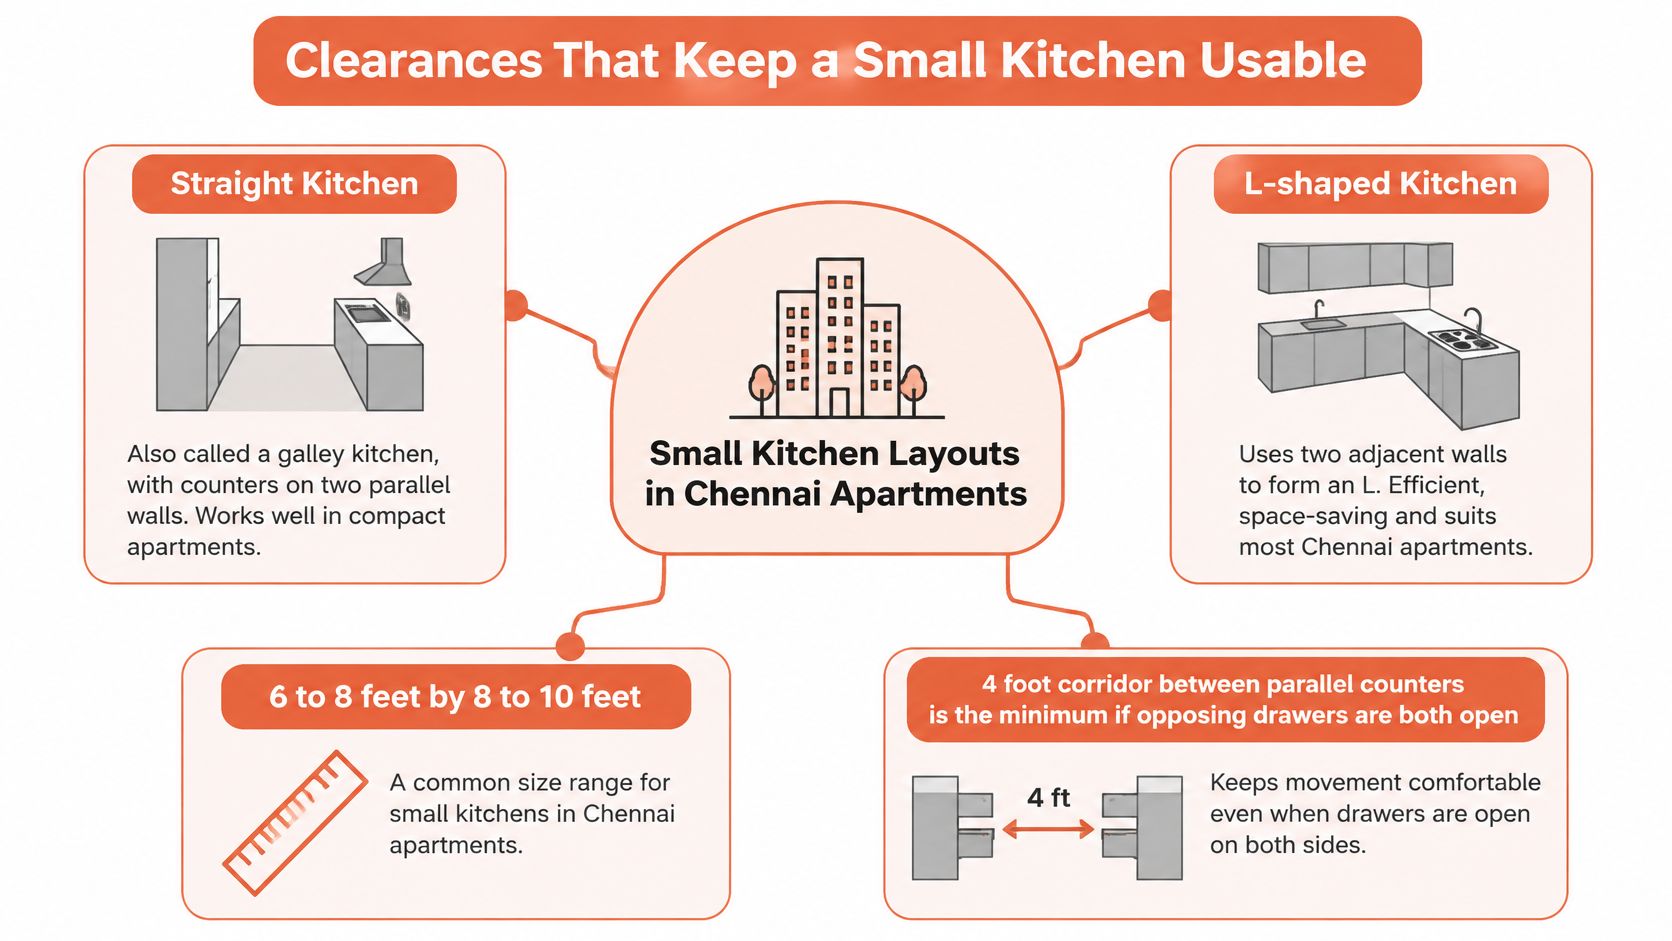
Many Chennai apartment kitchens are straight or L-shaped and compact. The Homeli guide to modular kitchen designs for small kitchens places typical compact kitchens around 6 to 8 feet by 8 to 10 feet and recommends at least a 4-foot corridor for parallel counters so opposing drawers can open without collision. In a room that size, clearance isn't a finishing detail. It's the design.
Mock-open everything before manufacture
Draw every pull-out at full extension, not closed. Then check the three clash points that cause daily irritation:
Opposing counters: both sides open together during two-person cooking, so one person at the hob and one at the sink shouldn't trap each other.
Pantry swing: an open tall unit door must not block the fridge, the sink, or the main walk into the kitchen.
Beside the hob: check heat, oil splashes, and handle clash, because a projecting handle on the next shutter is enough to stop smooth travel.
Daily masalas and bottles belong at waist height in the prep zone, within one step of the hob. Heavy vessels belong on full-extension hardware you can reach without stretching up or squatting deep. Rare bulk stock, the festival uruli or the spare container set, can go higher or lower because you fetch it monthly, not twice a day.
Reach and reduced mobility change the plan
Don't finish the cabinet plan and then add pull-outs for a household member with reduced mobility. India's government accessibility guidance for aged and disabled housing recommends drawers and pull-out vertical units at one or both sides of kitchen work centres instead of hinged base-cabinet doors with fixed shelves, and it specifies a minimum 1,500 mm clear width for wheelchair turning, worktop, sink and cooking surfaces at approximately 780 to 800 mm, and 700 mm of knee clearance below a sink. Those numbers have to shape the layout from the first sketch, because you can't retrofit turning width into a finished galley.
In homes where cooks differ in height, measure the main user's comfortable reach and place the frequently used pull-out inside that band. Full extension matters more than a taller stack of baskets nobody can see into at the back. A shorter unit that comes fully to you beats a taller one you have to climb or stretch for.
How to Measure the Cabinet Opening
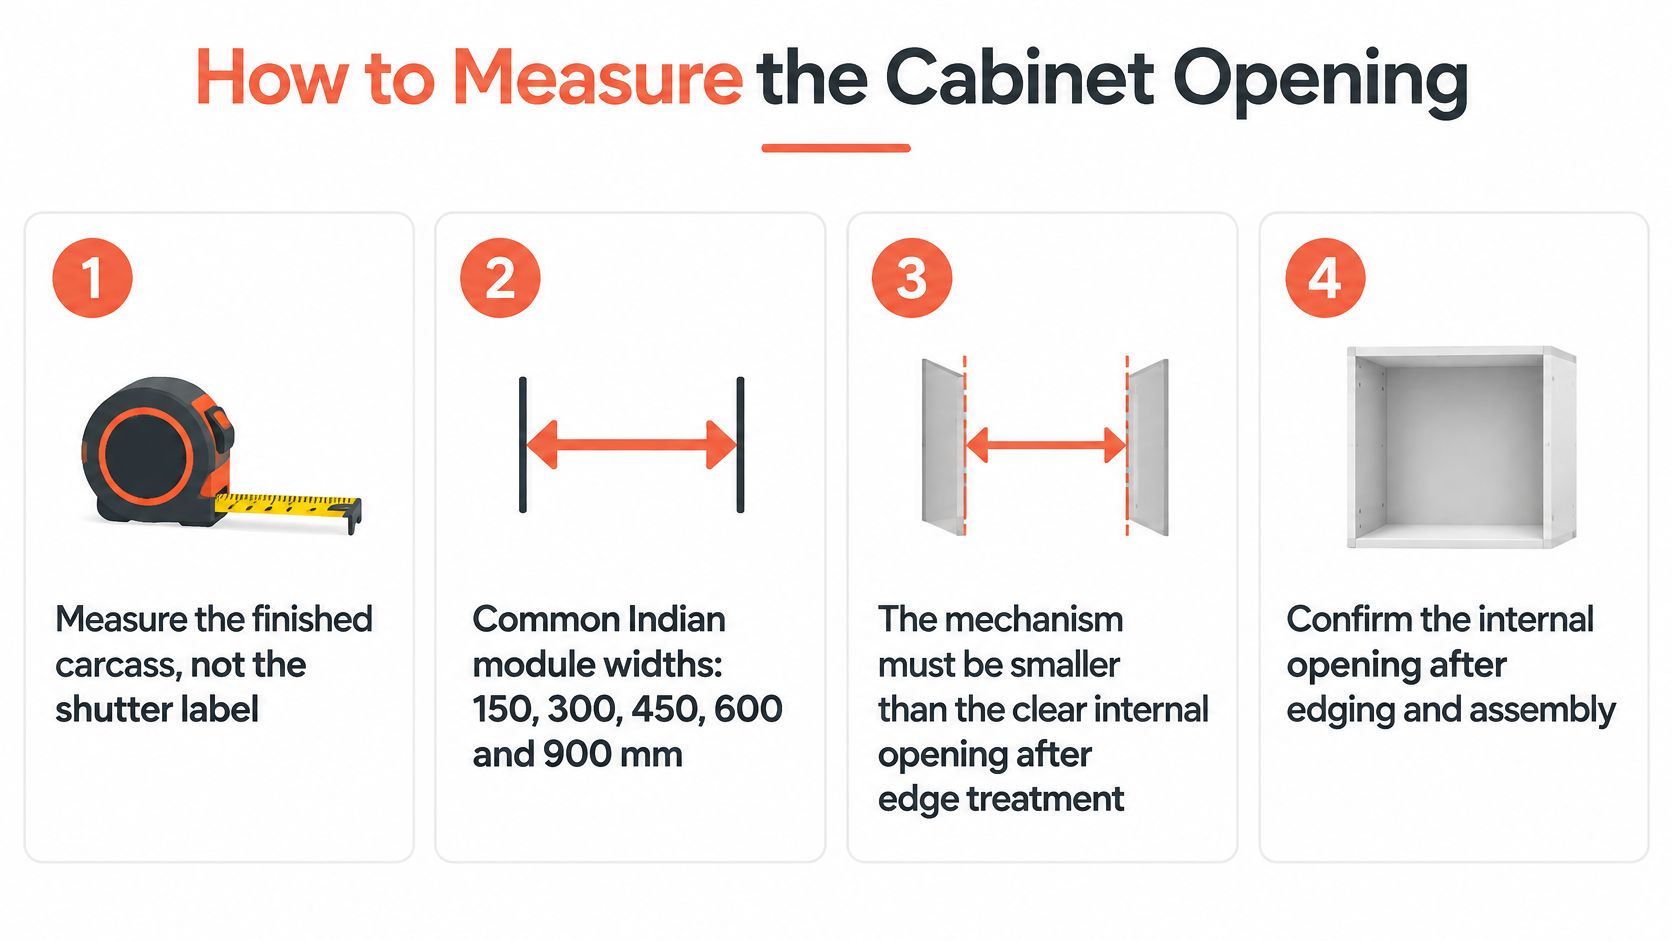
Measure the finished carcass, not the shutter label. Ordering by outside width is the mistake that makes a unit bind on day one, and it's entirely avoidable with four recorded numbers.
The Mirano guide to modular kitchen pull-out systems lists common Indian modular widths of 150, 300, 450, 600, and 900 mm, but stresses that the mechanism must be selected against the actual carcass opening rather than the nominal shutter size. Record clear internal width, usable depth, shutter thickness, and intended contents for every cabinet.
The measuring sequence that prevents ordering errors
Code each cabinet on the elevation. A code like B3 ties the drawing, the hardware order, and the site fitting to the same box.
Measure width at the front and the back. Boxes can be slightly out of square, especially in retrofits, and the smaller number governs.
Measure depth from the inside of the back panel to the inside face of the closed shutter. This is your usable depth, after edge banding, not the carcass depth on paper.
Note shutter thickness and handle projection. Both affect whether the frame clears the neighbouring front.
Weigh a typical load, then add a margin. Split rice, flour, bottles, and cookware across baskets so one shelf isn't point-loaded.
Pick a unit whose minimum clearance is smaller than the opening. Confirm the published load for that exact model, not the look of the wire.
Specify the material by zone. In a humid coastal kitchen, and anywhere near the sink or dishwasher, SS304 is the safer specification. Keep SS202 or chrome for dry storage only.
Write a hardware schedule. Model, width, depth, load, extension, and closing action, then approve one sample module before the rest are made.
Cross-check your numbers against standard modular kitchen dimensions for cabinets and counters before you place the order. It takes ten minutes and catches the mismatch between a nominal module and the box standing in your kitchen.
If the tape measure and the catalogue disagree, believe the tape measure. A mechanism can't negotiate with a carcass that's 8 mm narrower than the drawing said.
Retrofits need extra care. Older site-made cabinets are often irregular, with sides that aren't parallel and bases that aren't level. Measure twice in those boxes, and expect to pack or adjust rather than assume a standard unit drops in.
How to Fit the Pull Out Hardware
Fit one finished sample before repeating the method across the kitchen. A single proven module exposes every alignment problem while it's still cheap to fix. Each step below ends with what you should see if it's right.

Fitting steps with a pass or fail sign at each stage
Confirm the opening still matches the schedule. After edging and assembly, remeasure. Pass sign: the frame slides in by hand without forcing either side.
Mark runner fixing lines with a square. Both sides sit at the same height and the same depth. Pass sign: the two pencil lines measure equal from the cabinet base.
Screw into solid side panels, not a thin loose liner. On a retrofit, pack or reinforce a weak side first. Pass sign: the screw bites firmly and the runner doesn't flex when you push it sideways.
Set the runners level and parallel, then slide the frame in empty. Pass sign: it reaches full extension without scraping, tilting, or needing a shove at the end.
Fix the basket or pantry frame and set the front. Pass sign: the reveal around the shutter is even on all four sides.
Hang the shutter and adjust height and side gap before the handle goes on. Pass sign: the shutter line matches its neighbours when you sight along the run.
Open it beside the neighbouring door and handle. Pass sign: both fronts open together without touching, even with the pull-out extended.
Load it with your usual containers, not a token packet. Go empty, then normal daily load, then close to the rated load. Pass sign: no new scraping sound appears as weight goes in.
Watch for runner deflection, soft-close catching, and cabinet rocking. Pass sign: the front stays level, the soft-close pulls it shut gently, and the box doesn't move.
If the front drops or the side rubs, stop and reset the runners rather than forcing the shutter into line. Adjusting the shutter to hide a crooked runner just moves the wear somewhere you can't see it. The runner alignment is the cause. Fix the cause.
Corners and sink units need one extra check
A corner or sink unit follows the same sequence, with one addition. At full extension, confirm that pipes, the hinge side, and any purifier body still clear the moving frame. Turn the water on and check for drips after fitting, because a runner screw placed blindly behind a sink cabinet can nick a flexible line.
This sequence is the practical core of modular kitchen installation in Chennai apartments, where factory-finished units still depend on careful site alignment to travel smoothly. Factory precision gives you square boxes. Site fitting decides whether they stay that way under load.
I'll be plain about one thing: a pull-out that only works empty hasn't been fitted. It's been placed. The load test with your own rice tin, oil bottles, and cooker is the fitting, and skipping it is how smooth showroom movement becomes a jammed cabinet in month two.
Load Tests and Simple Hardware Care
At handover, run three tests on every unit: empty, normally loaded, and near rated load. Don't sign off on a kitchen where the pull-outs were only ever opened with nothing in them.
The Homestyler guide to designing a compact modular kitchen places Indian-market examples at roughly 22.5 to 30 kg for narrow bottle or masala pull-outs and about 50 to 60 kg for larger pantry systems, and it sets useful counter height around 860 to 900 mm, making waist-level pull-outs preferable for frequent or heavy items. While testing, check door reveal, side rub, runner deflection, soft-close engagement, and whether the cabinet rocks as it opens.
Pull-out faults, causes and fixes
What you see | Likely cause | Fix |
|---|---|---|
Front rubs the carcass | Runners are not parallel, or the unit was ordered to outside width | Reset both runners level and recheck internal width |
Front sags when full | Load is above that model's rating | Move rice, flour and cookware to a higher-rated drawer |
Soft close slams or misses | Channels are dirty, or the unit was only tested empty | Clean the runners and retest near the rated load |
Shutter hits the next door | Swing or handle clearance was never checked | Open both units in a corridor of at least 4 feet and reset the fronts |
Rust near the sink | Chrome or SS202 is sitting in steam | Replace wet-zone parts with SS304 |
Don't keep adding weight to a unit that already sags in the hope it'll settle. It won't. Sag means the runner is deflecting beyond what it was built for, and every loaded pull after that wears the bearing track faster. Move the dense items out first, then judge whether the runner has survived.
Monthly care that takes five minutes
Keep dense staples spread across baskets rather than stacked in one corner. Wipe wet grocery drips promptly, especially under the sink, and don't hang extra weight on a wire front. A soft-close that slams usually needs a clean channel, not a heavier door. Grit, rice grains, and dried dal in the runner track are the usual culprits in an Indian kitchen.
Once a month, open each unit fully, look for screws backing out, and tighten only to firm. Overtightening into board strips the hole and leaves you worse off. If a runner has bent, replace that model rather than packing the side, because the rating is already lost.
Tell everyone in the house the limit in plain language. A masala pull-out rated for light jars is not the home for a wet rice bin, no matter how well it fits. Write the model and rating on a label inside the cabinet so a later repair matches the original hardware instead of a lookalike slide with a lower capacity.
Freeze the Pull-Out Schedule Before Ordering
Before any shutter or runner is ordered, lock the pull-out schedule in writing. Everything you've measured and tested until now becomes one document the factory and the site team both work from.
The decision checklist to take to your supplier
List every cabinet by its code. Mark each one as pull-out, drawer, or fixed shelf on the coded elevation, with no blanks left for someone else to fill.
Enter measured numbers, not nominal sizes. Clear internal width and usable depth come from your tape measure on the finished carcass.
Write the rated load beside each unit. Use the figure the manufacturer publishes for that exact model, whether it's a narrow bottle unit, a pantry frame, or a cookware drawer.
Note the material by zone. SS304 within reach of the sink, dishwasher, or steam. SS202 or chrome only in dry storage.
Confirm the sample module has passed. Full extension, front alignment, and door clearance, checked under load.
Reassign failures accurately. Any cabinet that fails the rub, sag, or door clash check becomes a drawer or shelf instead of relying on site adjustment to save it.
Bring the marked elevation and a list of your heaviest daily containers to the supplier. Say a household stores a 10 kg rice bin, two pressure cookers, and a set of oil bottles. Each of those needs a named home with a rating that covers it. If the supplier can't point to the model and load figure for each one, the schedule isn't ready.
Before you sign: ask for the schedule to be signed off in writing so the hardware fitted on site matches the model and load that were approved. Verbal agreement is how a specified runner becomes a cheaper substitute.
Hardware choice is part of that sign-off. Our standard modular kitchen hardware is Hettich, and Hafele, Blum, and Ebco are also used, with hardware customisation possible where a specific load or movement suits your kitchen better. Whatever brand you settle on, the model number belongs on the schedule, not just the brand name, because ratings differ within every brand's range.
Two commitments make that schedule easier to hold us to. Modular kitchen and wardrobes are delivered in 35 days, so the approved hardware has a fixed date to arrive against. Every modular kitchen comes with a 15-year modular warranty that includes free replacement in the first 5 years, which gives the load ratings and material choices on your schedule real weight after handover.
A frozen schedule sounds like paperwork. It isn't. It's the difference between a pull out for kitchen cabinets that glides under a full load in year five and one that sagged by the first Pongal. Measure carefully, load-test with your own containers, and let a few cabinets stay as simple drawers or shelves where that serves you better.
Bring your cabinet elevation and your heaviest daily containers to Interiors by DeX, and we'll mark every carcass as pull-out, drawer, or shelf, match each unit to a rated Hettich, Hafele, Blum, or Ebco model, and freeze the schedule before production begins. Your modular kitchen is delivered in 35 days with a 15-year modular warranty and free replacement in the first 5 years, so the hardware we agree on together is the hardware that has to perform in your Chennai home.