DE X INSIGHTS
2 Door Sliding Wardrobe: A Practical Homeowner Guide

You're standing in a compact Chennai bedroom, trying to open a hinged wardrobe while the bed blocks the door and a side table catches your elbow. The room may be a comfortable 10x12 or 11x13 feet, but once the queen bed, side tables, dressing area, and circulation path are in place, the wardrobe wall has very little spare space.
That's where a 2 door sliding wardrobe earns its place. It isn't automatically the better-looking option, and it doesn't give access to the entire interior at once. It works because the doors move within the wardrobe frame, so the room doesn't need a clear swing zone in front. In Chennai, where older apartments may have narrow corridors, uneven walls, red dust, and coastal humidity, the right result depends on measurement, materials, hardware, and installation discipline.
Why a 2 Door Sliding Wardrobe Fits Indian Bedrooms
A hinged wardrobe needs a clear opening zone in front. Indian planning guidance places that swing requirement at 600 to 700 mm, while a wardrobe with sliding shutters needs no front swing clearance, as explained in this Indian wardrobe planning guidance. That difference can decide whether you can walk comfortably between the bed and wardrobe or have to move furniture every time you get dressed.
A 2-door format usually suits a wall span of about 5 to 7 feet. Indian size guidance commonly places each sliding shutter between 18 and 24 inches, with wardrobe heights around 7 or 7.5 feet according to this standard door size guide. In practical terms, a wardrobe around 1200 to 1800 mm wide can balance useful storage with the wall length available in many urban bedrooms.
The doors still need room within the track housing. Don't confuse that with a large empty zone in front. The panels overlap and travel sideways, which is why the wardrobe can sit near a bed, narrow passage, or side table without competing with the room's circulation.
Practical rule: Choose sliding doors because the room needs them, not because a glossy panel looks fashionable.
Chennai adds another layer. A sealed front helps keep garments away from everyday dust and damp air, but it won't correct poor board selection or water entering from the floor. For general background on sliding-door movement and applications, Intech Corporation's sliding doors resource is useful when comparing the basic operating principle with other sliding systems.
India's wardrobe category is also part of a wider organised furniture market. The India wardrobes market is projected to grow at a 6.3% CAGR during 2025 to 2031, according to the market reference provided through IKEA's wardrobe range for India. For a Chennai homeowner, the decision remains practical: preserve circulation, gain full-height storage, and specify a construction that can handle the local environment.
Measuring Your Bedroom Before You Order
Start with the opening, not the product catalogue. Measure the intended wall from floor level, at mid-height, and close to the ceiling. Older Chennai apartments often have walls that taper slightly or corners that aren't square, and the smallest width is the one your designer must work with.
Measure the opening and height
Record the floor-to-ceiling height at both ends and at the centre. Look for air-conditioning vents, cornices, fan paths, curtain pelmets, beams, and window sills. A full-height unit may look efficient on paper but become impossible to install if the top track collides with an AC line or the shutter cannot be lifted upright.
Take depth measurements at the skirting, wall centre, and upper section. A sliding wardrobe often needs an outer carcass around 600 to 680 mm, while the usable internal depth may fall to roughly 540 to 580 mm after tracks, panels, and guides are accounted for. A separate Indian planning guide notes that a standard body depth is 60 cm, but a sliding unit may require around 650 mm overall depth because of the overlapping track and its allowance of 7 to 10 cm. Review the modular wardrobe planning guidance from Durian before finalising the footprint.
The panel meeting area needs its own allowance. For a 2-door system, allow approximately 80 to 100 mm for the overlap zone, then confirm the manufacturer's profile specification. One Indian sliding-system reference lists an approximate 50 percent opening width, a 10 mm gap between doors, and a 30 mm overlap for its cited profile, as detailed in Slido's sliding-system FAQs.
Check the floor and surrounding fittings
Place a spirit level across at least three floor points along the wardrobe run. Note the skirting height, switchboard positions, plug points, and any wall-mounted control panels. Mark where the track housing will sit and check that you have about 50 mm side clearance for the track and finishing details.
Photograph every corner straight on. Write the measurements directly on the photographs, including the smallest width and the lowest ceiling point. If you're comparing a custom-built solution, custom-built wardrobe planning guidance from Interiors by DeX can help you think through how site measurements translate into the final carcass and shutter design.
Internal Layouts That Actually Work Daily
The best internal layout depends on what you reach for every morning. A wardrobe can have an attractive exterior and still frustrate you if drawers sit behind the door overlap or daily clothes are stored above eye level.
For a unit roughly 1500 to 1800 mm wide and 2100 to 2400 mm tall, compare the options below. These dimensions are planning ranges, not a substitute for checking the room and the selected hardware system.
Match the layout to the household
Configuration | Layout Description | Best User Type |
|---|---|---|
A | A 50-50 split, with full hanging on one side and shelves plus drawers on the other | A household storing mostly folded clothes |
B | Hanging space at the top, pull-out drawers in the middle, and a shoe or luggage shelf at the base | Users who need a mixed daily wardrobe |
C | Full-height double hanging with a mid-mounted rod | Users storing many shirts and kurtas |
Configuration A is easy to understand and tends to work well when folded clothes dominate. Keep the drawers within the clear opening of one door rather than placing them directly across the central meeting line. Remember that only part of a 2-door wardrobe is visible at a time, so the internal arrangement must respect the moving panels.
Configuration B gives the most balanced daily use. Use the upper hanging zone for less frequently handled garments, place daily folded items in the middle, and keep bags, shoes, or luggage low. This prevents the bottom shelf from becoming an unplanned dumping area.
Configuration C uses the vertical volume efficiently for shirts, kurtas, and other shorter garments. A mid-mounted rod creates two hanging levels, but it isn't suitable if most garments are long dresses, coats, or full-length clothing.
Zone the interior before adding accessories
A useful starting division is:
0 to 400 mm: Shoes, bags, and heavier luggage.
400 to 1500 mm: Folded clothes, drawers, and frequently reached accessories.
1500 to 2100 mm: Daily hanging for shirts, kurtas, and similar garments.
Add a trouser rod only where it won't collide with the door overlap. Tie racks suit a narrow side zone, while jewellery drawers need a protected, easily reached position rather than the deepest corner. Before approving the drawing, slide each door mentally across the layout and ask whether the drawer, pull-out rail, or accessory can open fully.
For a Chennai-specific approach to balancing these zones with local apartment living, see wardrobe internals planning for Chennai homes.
Materials, Finishes, and Hardware That Last
Chennai humidity exposes weak construction quickly, especially where the wardrobe meets the floor. The carcass material matters, but edge sealing, bottom-panel protection, and track design often determine whether the unit continues to look clean after repeated monsoons.
Compare the board options honestly
BWR plywood is a sensible choice where moisture resistance is a priority, particularly for lower panels and areas close to the floor. HDHMR offers a dense, stable surface for painted or laminated components. MDF can give a smooth finish, but exposed or poorly sealed edges are vulnerable when dampness reaches them. Particle board can work in controlled conditions, yet it demands careful edge protection and should not be treated as equivalent to a moisture-resistant board.
Option | Humidity Response | Dust Visibility | Typical Lifespan |
|---|---|---|---|
BWR plywood | Better suited to damp-prone areas when edges are sealed | Depends on finish, usually moderate | Long when protected from standing moisture |
HDHMR | Dense and stable, suitable for many finished surfaces | Low to moderate with a matt finish | Long with sealed edges |
MDF | Smooth and workable, but exposed edges need protection | Finish-dependent | Moderate when kept dry |
Particle board | More vulnerable if moisture reaches cut edges or the base | Finish-dependent | Shorter where humidity and floor dampness are unmanaged |
Acrylic shutter | Surface is easy to mark with fingerprints and fine scratches | Dust and fingerprints can show clearly | Finish life depends on careful cleaning |
Laminate shutter | Practical, generally easier to maintain | Matt textures hide dust better than gloss | Long with sound edge treatment |
The 0.8 mm PVC lipping debate is less important than consistent application. A securely bonded edge with no exposed core is more valuable than a nominal thickness that has been poorly fitted. At the floor, ask whether the design includes a PVC tambour strip or another barrier that keeps damp cleaning water and dust away from the bottom edge.
Treat the track as the working mechanism
Hardware is where many sliding wardrobes fail. Ask for the track gauge, roller bearing type, load rating, soft-close mechanism, anti-jump blocks, and top guides in writing. Residential guidance places sliding panels commonly within 460 to 600 mm per door width, with residential leaf ratings around 50 to 100 kg and one cited setup rated at 80 kg per leaf, as outlined in this Indian interior hardware guide.
Top-hung systems are generally quieter and smoother when the top structure is properly built. Bottom-rolling systems can work well, but their channels collect Chennai dust and need closer attention. For a useful finish comparison, review laminate versus acrylic wardrobe finishes.
Read the warranty before signing. It should state whether coverage applies to rollers, tracks, soft-close units, mirror or glass panels, swelling, installation faults, and call-out visits. A warranty that covers only the board while excluding the hardware leaves the most failure-prone part outside the agreement.
Installation Day and Common Site Issues
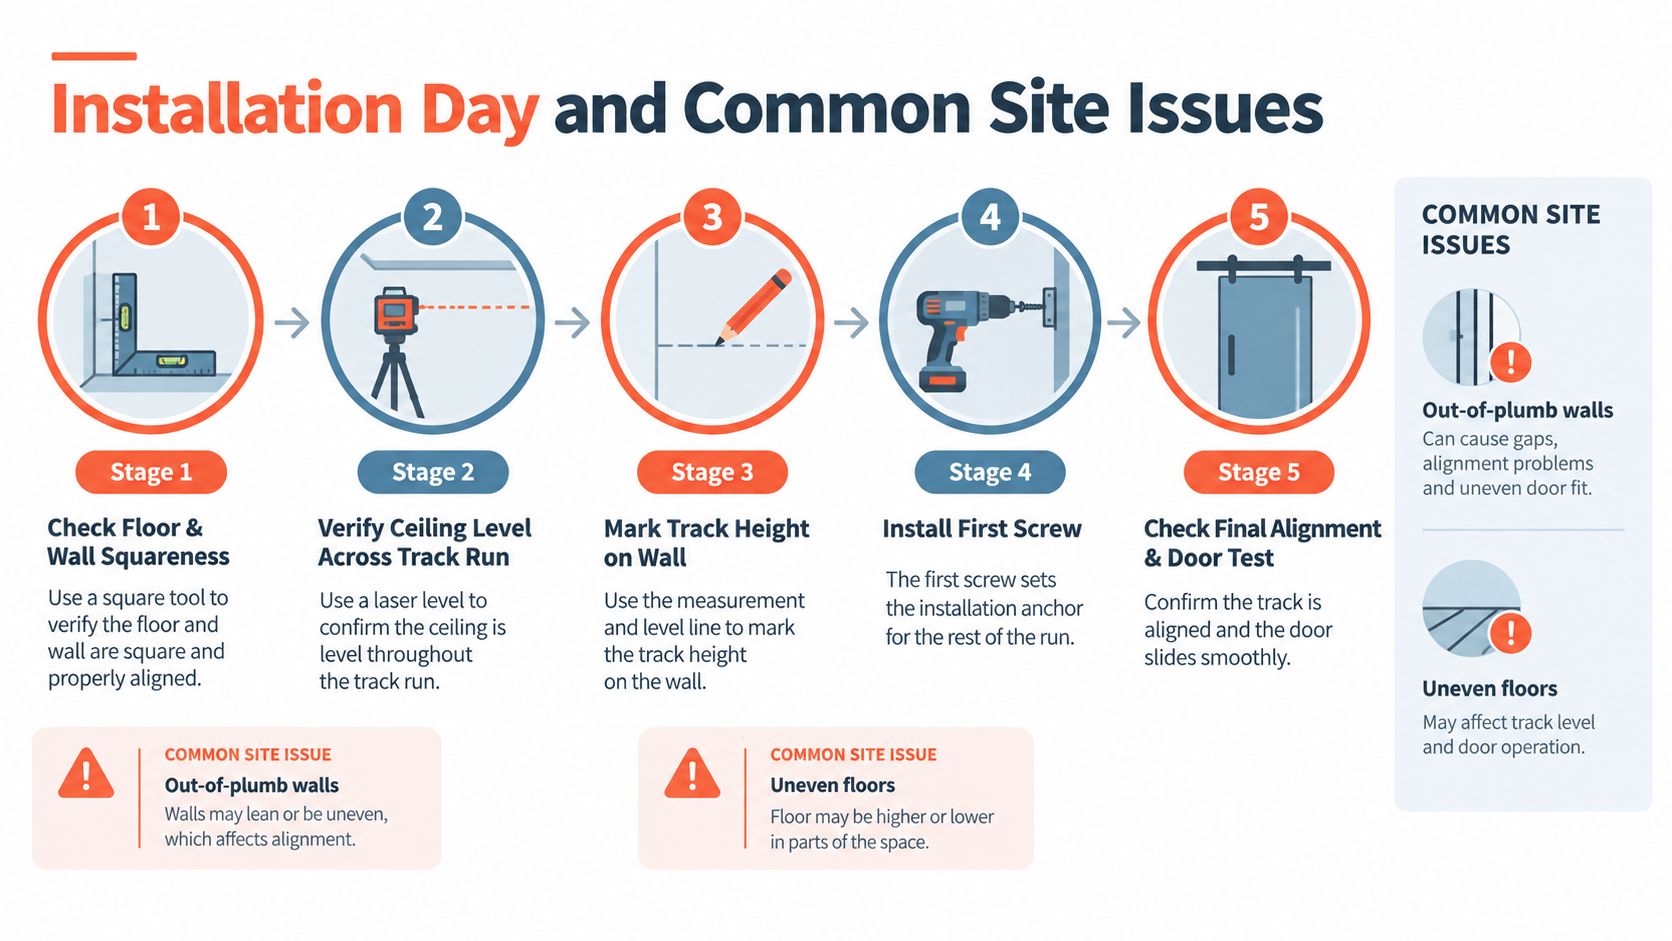
Installation day starts with tools on the floor, not with the doors being unpacked. The fitter should first check wall squareness and floor level across the complete wardrobe run. If the base slopes, the team must correct it before fixing the track, rather than hoping the roller adjustment will solve everything later.
The ceiling line is checked next. A laser level or long spirit level confirms whether the top track can run true across the opening. The fitter then marks the track height, checks the wall for concealed wiring and plumbing, and establishes the first fixing point. That first screw becomes the installation anchor for the rest of the run, so a careless starting point can create a gradual alignment error across the entire wardrobe.

What the fitter should resolve on site
An uneven floor can make a door drift or rub. A small 4 mm shim under the track can correct the base condition when the system and site detail allow it, but the fitter must verify the manufacturer's method rather than improvising with loose packing.
Wall openings also need checking around switchboards, electrical points, and window sills. A socket may need relocation before the carcass closes the wall, while a sill can reduce the available height at one corner. These are site coordination issues, not wardrobe styling decisions, and they're cheaper to fix before the panels arrive.
A Chennai installation can also involve a dusty corridor, tight stair turn, or restricted lift access. Measure the route before ordering full-height panels. Sliding shutters are awkward to manoeuvre, and a perfect design is useless if the largest panel can't reach the bedroom.
Handover is a working test
Before the team packs up, move both doors across the entire track. Check the overlap, the gap between panels, the soft-close engagement, and the sound of the rollers. Open every drawer with the door in its practical position, then test whether the anti-jump devices and top guides are engaged.
Flag a dragging, juddering, or noisy door immediately. Indian installation guidance identifies track grit, roller wear, loose guides, poor levelling, and misalignment as common causes of failure, with a twice-yearly clean and roller-bracket tightening described as sufficient preventive maintenance in ordinary conditions. A door that needs force on handover won't improve through daily use.
Maintenance Routine and Final Handover Checklist
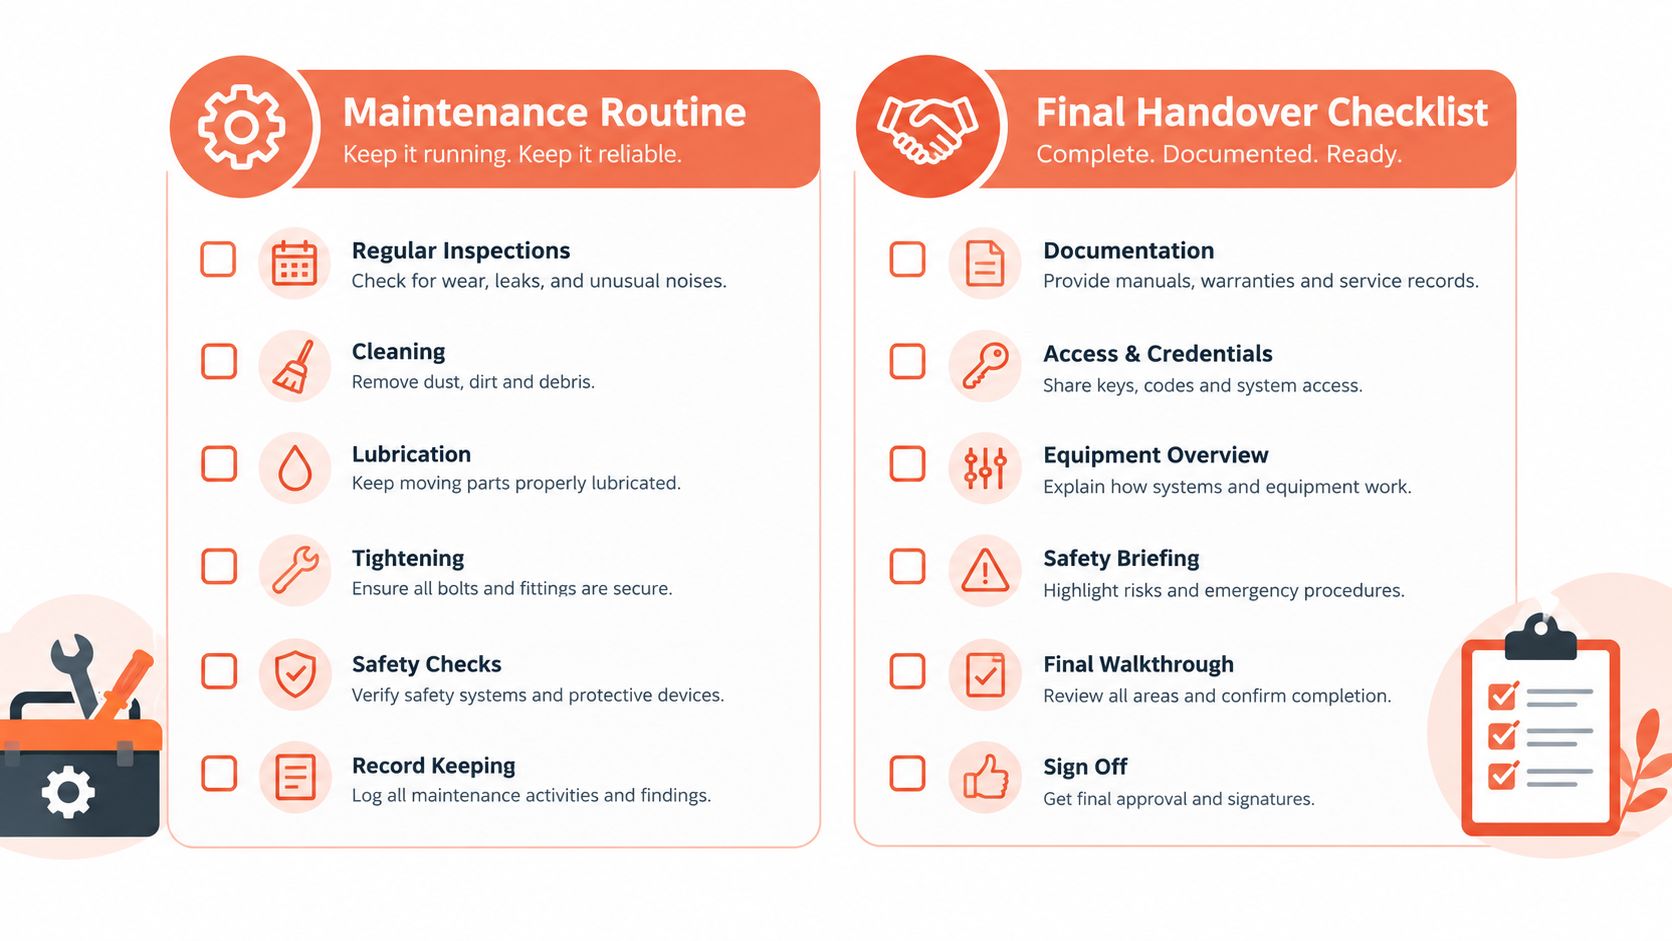
Sliding wardrobes need a repeatable routine, not an occasional deep clean after the doors start sticking. Chennai's dust enters through windows, corridors, and construction activity, while monsoon moisture affects unprotected edges and low-grade boards.
Keep the tracks dry and clear
Use a vacuum with a narrow nozzle to remove grit from the full top and bottom channels. Follow with a dry, soft cloth. Don't pour water into the track, and don't use ordinary oil because it attracts dust and turns the channel into an abrasive paste. Where the hardware manufacturer permits it, use a dry silicone lubricant sparingly.
Indian guidance recommends regular track attention, with one Chennai-relevant source specifically calling for monthly track cleaning, silicone-based lubrication, and moisture-resistant cores such as BWR plywood or HDHMR. The same advice highlights dust in bottom tracks, swelling from humidity, and grinding rollers as practical causes of poor movement, as explained in this India-focused sliding wardrobe maintenance guide.
Use a soft, damp cloth on laminate, then dry the edges. Acrylic surfaces can show fine scratches, so avoid abrasive pads and powder cleaners. Mirror shutters need a glass-safe cleaner applied to the cloth rather than sprayed into the frame or lower track.
Use a seasonal checklist
Before monsoon conditions intensify, inspect the floor strip, silicone sealant, bottom edges, and any exposed board joints. Wipe laminate edges before moisture has time to sit there. Check roller brackets, top guides, anti-jump blocks, and soft-close catches. If a door begins to rub, adjust the roller as specified by the hardware maker instead of forcing the panel.
At handover, ask the installer to tick these items:
Alignment: Both doors sit level and meet cleanly.
Movement: Each panel glides across the complete track without drag.
Soft-close: The catch engages before the door reaches the end stop.
Edge sealing: Lower edges, side edges, and track-adjacent panels are protected.
Warranty record: The hardware warranty card and product details are included.
Spare parts: Track stoppers and other agreed spares are handed over.
A 2 door sliding wardrobe works best when the room measurements, internal zones, moisture protection, and track specification are decided together. Interiors by DeX offers Chennai-focused wardrobe design and build, including full-height sliding wardrobes, custom storage planning, installation, and handover coordination. If you're ready to plan a wardrobe around your bedroom's actual clearances and daily storage habits, visit Interiors by DeX to discuss the space with their residential interiors team.