DE X INSIGHTS
Electrical Points in Bedroom Guide for Perfect Placement

You're standing in a newly handed-over bedroom in Chennai. The bed is in place, the wardrobe doors open correctly, and the ceiling light works. Then bedtime arrives. The only switch is near the entrance, the bedside socket sits behind the headboard, and charging your phone means bringing an extension board across the floor.
That problem starts long before handover. It begins when electrical points are marked without the bed, nightstands, wardrobe depth, TV unit, study desk and air conditioner being fixed on the same drawing. A bedroom needs more than one ceiling light and one socket. It needs power and control points that match how people enter, sleep, read, charge devices, work and watch television.

After handing over more than 200 bedrooms, the failures I see are rarely dramatic. They're small daily irritations, a missing switch, a blocked socket, an AC point hidden inside a loft, or a TV outlet placed where the wall bracket cannot use it. Good planning removes these problems on paper, before plaster, paint and carpentry make corrections expensive.
This guide maps electrical points in bedroom planning to furniture and daily use. It covers practical counts, switch locations, socket heights, dedicated loads and a final handover check. A coordinated process, similar to the structured stages described in this foundation on construction project management resource, helps keep space planning, electrical work and carpentry decisions aligned.
Introduction to Bedroom Electrical Planning Done Right
A bedroom handover should be tested as a living space, not just as a collection of working fittings. Sit on the bed. Reach towards both sides. Walk in through the door at night. Open the wardrobe. Place a phone charger, reading lamp and laptop where they'll be used. These simple actions reveal more than a visual inspection from the centre of the room.
In one common Chennai apartment layout, the bed is shifted slightly after electrical work to improve wardrobe access. That small change can put one bedside board behind the headboard and leave the other too close to a sliding wardrobe panel. The electrician may have followed the original marking correctly, but the room still fails in daily use because the furniture plan and electrical plan were treated as separate jobs.
Start with the bed orientation
The bed is the main reference point. Its headboard wall decides where bedside controls, charging sockets, reading lights and path lighting should sit. A double bed needs access from both sides, so a switch that works only from one nightstand is an incomplete solution.
The entrance matters just as much. The main light and fan controls should be reachable when you enter, while the same functions should remain controllable from the bed. Controls must not disappear behind the headboard, because a technically correct point becomes useless once furniture covers it.
Compact flats need even more discipline. A short wall may have to accommodate a wardrobe, TV, study ledge and bedside table. If points are marked first and furniture is designed later, one of those elements will usually force a compromise. Marking the furniture footprint, door swing and clearances before chasing the wall prevents that chain of rework.
Site rule: If a point cannot be reached with the furniture in its final position, it hasn't been properly planned.
Plan for sleep, work and entertainment
A modern bedroom may support bedside charging, reading, a ceiling fan, air conditioning, television, Wi-Fi equipment, a laptop and a dressing mirror. That doesn't mean every wall needs a crowded switchboard. It means each point should have a clear job and a suitable circuit arrangement.
At Interiors by DeX, electrical and lighting coordination is carried out alongside space planning, so bedside switches, study points, TV services and wardrobe locations can be reviewed before civil and carpentry work locks the layout. That sequence gives the homeowner a chance to approve the room as a working arrangement, not merely as a finished elevation.
How Many Electrical Points Your Bedroom Actually Needs
A useful starting point for Indian residential planning is 6 to 10 electrical points for a bedroom, with separate allowances for lighting, fan control, sockets and dedicated-use points, as outlined in this India-focused house-planning guide. The same guide places the kitchen at 10 to 14 points, so a bedroom is generally a moderate-load room rather than a heavy appliance zone.
Those figures are a planning range, not a blind target. A secondary bedroom used mainly for sleeping may need fewer functional points than a master bedroom with a television, study desk, dressing unit and AC. A master bedroom may need a broader arrangement, while a guest room can remain simpler without leaving future occupants dependent on extension boards.
Build the count by function
Start with the points that serve fixed room features:
Main lighting: Provide the ceiling light point and its switching at the entrance, with bedside control where required.
Fan control: Allow for the fan point, regulator and accessible control arrangement. A fan point is not the same as a general socket.
Bedside use: Provide points for charging, lamps, reading lights and night lighting on the two sides of the bed.
Dedicated AC supply: Treat the AC point as a planned appliance connection, not as another general socket.
TV or study use: Add power and service provisions only where the furniture plan confirms a TV, desk or work surface.
Future flexibility: Consider a data or network point if the room will carry a TV, work desk or Wi-Fi equipment.
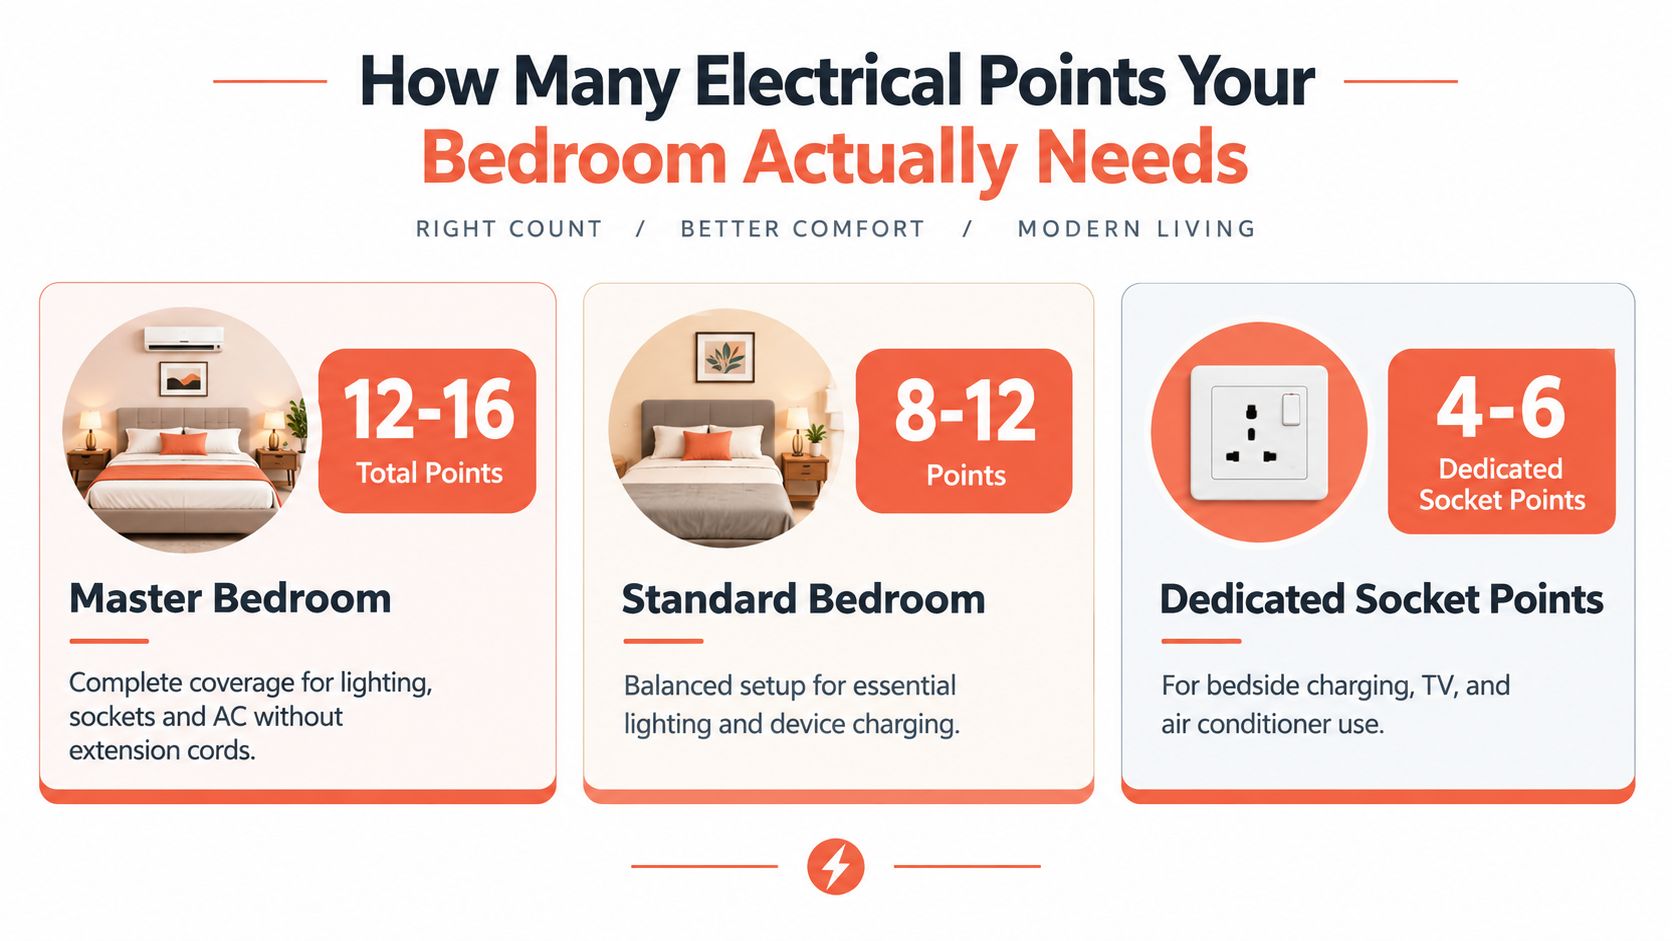
A practical framework for a master bedroom is 12 to 16 total points, while a standard bedroom can often be organised around 8 to 12 points, provided each point has a known use. The infographic's dedicated socket framework shows 4 to 6 socket points for bedside charging, TV and AC use. These figures are editorial planning bands for modern layouts, so the final electrical schedule should still be checked by the project electrician against the actual appliances and circuit design.
More points don't automatically mean better planning
Adding unused sockets to every wall can create visual clutter and unnecessary cost. The stronger question is whether the points are distributed according to the room's load and furniture. One properly placed bedside socket with its own adjacent switch is more useful than several sockets hidden behind a bed.
Older schedules may describe a bedroom with 2 to 3 light or 5A outlets plus one 15A outlet, as shown in this electrician trade theory reference/files/basic-html/page91.html). Modern rooms often need 3 to 4 general bedroom outlets plus a dedicated AC point, because charging, TV and work equipment now share the space. The practical improvement isn't simply increasing the count. It's separating likely loads and avoiding long flexible cords, multi-plug adapters and overloaded extension boards.
Lighting and Switch Placement That Follows Daily Movement
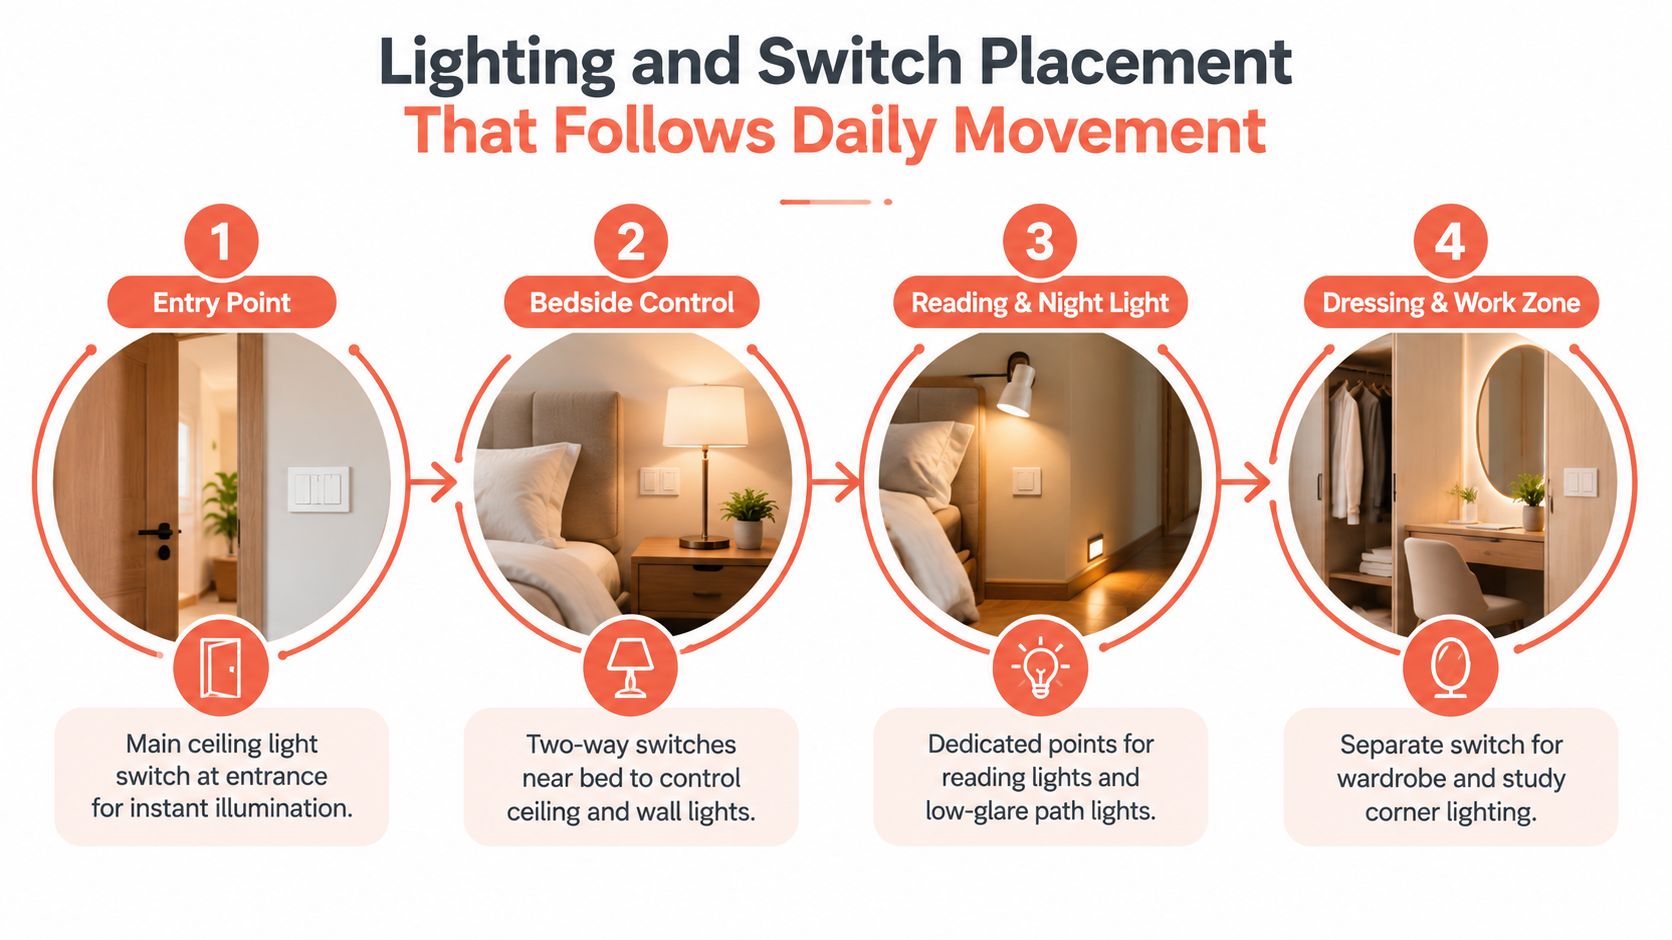
Walk through the room in the order a person uses it. At the entrance, you need immediate light. Near the bed, you need control without standing up. At the reading or dressing zone, you need focused illumination rather than one bright source for every task.
The entrance switchboard should sit where the door swing won't hide it. Check the latch side and the final architrave or trim before fixing the box. A switch placed behind an open door may meet a rough drawing dimension, but it fails the first time someone enters carrying laundry or groceries.
Use two-way control where the bed demands it
BIS residential electrical-layout guidance specifies two-way controls for the bedroom light and fan near the entrance and adjacent to the bed. It also says the controls should remain accessible from both sides of a double bed and must not be positioned behind the headboard. The guidance includes bed-near points for night lamps or path lights, reading lights and a general-use plug outlet. You can review the BIS residential electrical-layout guide before approving your drawing.
The reason is straightforward. A person entering the room should be able to switch on the main light, and a person lying in bed should be able to switch it off. The same logic applies to fan control. If the regulator is only near the door, somebody must get up whenever the speed needs changing.
Bedside switches should be placed where a person can reach them while seated or lying down, but not where pillows or the headboard will press against them. For a double bed, keep the arrangement balanced on both sides. Before final fixing, place a temporary mark at the proposed board position and test it with the actual mattress height and bedside table.
Separate the lighting tasks
The ceiling light handles general illumination. Reading lights should serve the pillow or shoulder area without shining directly into the other person's eyes. A low-glare night or path light should help with movement without flooding the room at night. Wardrobe and study lighting deserve separate switching so you don't illuminate the entire room for a small task.
A consistent switchboard height helps the room look organised, but usability comes first. Align boards where possible, then check the door casing, wardrobe edge, headboard thickness and nightstand top. For broader lighting principles, this guide to Forward Electrical lighting ideas offers useful context on layering light by activity.
The ceiling fixture should also suit the room's proportions and bed position. Review bedroom ceiling light ideas before selecting the final fitting, especially if a fan, false ceiling or pendant will share the same visual centre.
Plug Points AC and Data Points Planned by Use Not Just Count
A bedroom socket schedule should begin with the furniture plan and end with the expected load. A bedside wall may carry a phone charger, lamp, watch charger and reading light. A study wall may carry a laptop, monitor, printer or task lamp. A TV wall may need the television supply, set-top box, soundbar and network service. These are different uses, even when they sit in the same room.
Indian planning still includes modest bedroom schedules such as 2 to 3 light or 5A outlets and one 15A outlet, while newer home-planning guidance recommends 3 to 4 bedroom outlets plus a dedicated AC point. The difference reflects how bedrooms now operate as charging, entertainment and work zones. The better approach is to allocate points by wall and then confirm which loads need dedicated protection or circuits.
Allocate each wall before marking the chase
Use the table as a briefing tool. Adjust it to the actual bed, wardrobe, desk and TV dimensions rather than copying it mechanically.
Wall Location | Recommended Points | Typical Use |
|---|---|---|
Bedside walls | 2 socket points, one on each side where the bed permits | Phone charging, bedside lamps, reading lights |
TV wall | 2 to 3 points, depending on equipment | TV, set-top box, soundbar, media devices |
Study or dressing wall | 1 to 2 points | Laptop, task lamp, grooming equipment |
AC wall | 1 dedicated AC point | Air conditioner supply |
Network or service location | 1 data or service provision where required | TV connectivity, work desk or Wi-Fi equipment |
The table separates a general outlet from an AC point because they don't serve the same electrical demand. A dedicated AC connection should be positioned near the final indoor unit location, with access for maintenance and without hiding the point behind a loft or wardrobe.
Avoid loading one short wall
In Chennai apartments, the longest usable wall often seems like the obvious place for the TV, study ledge and charging station. That can put several devices on one cluster of sockets. Move the study point to the actual desk location, keep TV services behind the TV unit, and reserve the AC supply for its own planned connection.
Wi-Fi equipment also needs a sensible location. If the bedroom has weak coverage, first review router placement and settings through a practical resource on how to fix slow Wi-Fi at home, then decide whether a data point or service outlet belongs in the room. Don't install a random socket behind a wardrobe because it's convenient during rough-in.
A clear quotation should identify these points, their circuits and the installation scope. Compare the electrical schedule with the electrical work quotation in Chennai before work begins, so a missing TV, data or AC provision doesn't appear as a surprise variation later.
Safe Heights Shuttered Sockets and Furniture Coordination
The safest bedroom outlet is one that uses the correct socket type, has an adjacent switch and remains accessible after furniture installation. A high point hidden behind a wardrobe isn't useful. A low point exposed to children or obstructed by a bed leg isn't a good solution either.
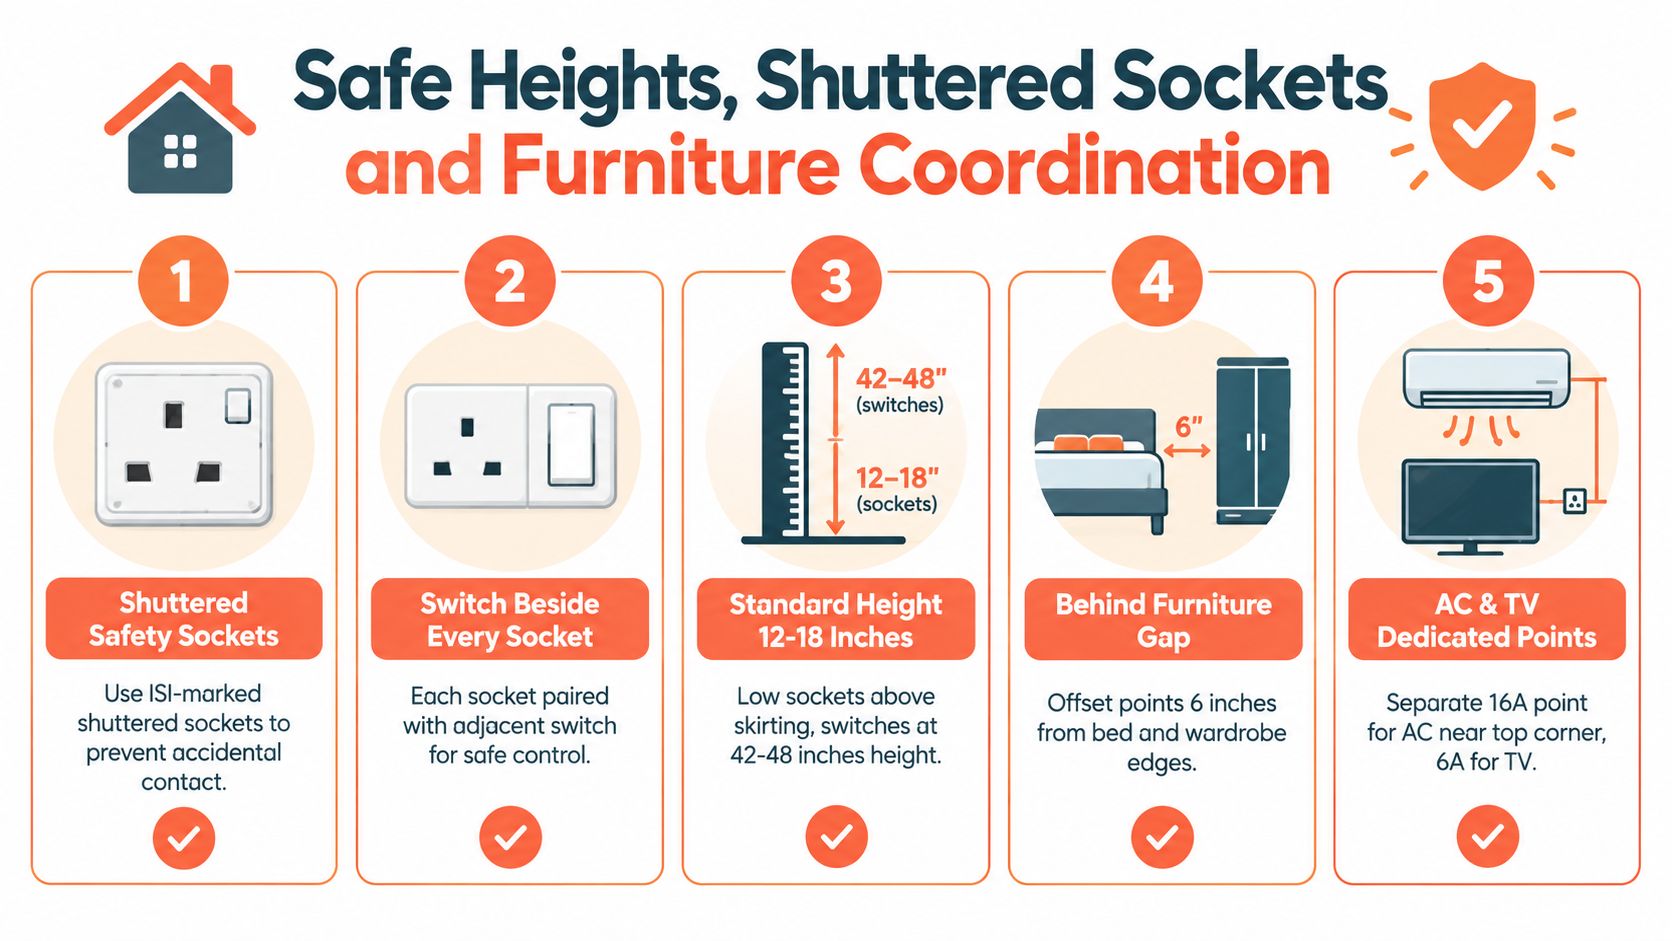
Household socket-outlets up to 16 A fall under IS 1293, and the 2019 revision made shutters compulsory for all socket-outlets, as summarised in this IS 1293 safety reference. Shutters help prevent accidental contact when a plug isn't inserted. Specify compliant, good-quality products and don't treat a decorative plate as a substitute for electrical safety.
Match height to the user and the furniture
BIS wiring guidance allows ordinary socket-outlets at a convenient height above 20 cm from floor level. In domestic premises likely to be occupied by older or disabled people, it recommends socket outlets at not less than 1 m from the floor, according to this BIS wiring installation guide.
A published NBC 2016 excerpt gives a mounting range of 800 mm to 1100 mm above floor level for 16 A socket-outlets, with a preferred minimum clearance of 700 mm from any internal corner, as shown in this NBC electrical-installation excerpt. These references should be read with the actual room layout and the advice of the licensed electrical professional responsible for the installation.
The point is not to force every outlet to one universal height. A bedside board may need to align with the nightstand, while an AC point must suit the indoor unit and service access. A study socket should sit where the desk will not cover it. A point intended for an older occupant may need to be raised for easier reach.
Protect the point from future carpentry
Before wiring, mark these items on the same elevation:
Bed and headboard: Show the complete headboard width, thickness and side tables. Keep switches outside the headboard footprint and away from pillow pressure.
Wardrobe and loft: Mark carcass depth, shutters, drawers and loft edges. Don't place an outlet where a drawer or hinged door will strike the plug.
TV unit and study: Draw the cabinet, cable opening and service cavity. A TV point hidden behind a closed panel is difficult to use and repair.
Door and trim: Check the door swing, frame and skirting before fixing the entrance board.
Cleaning access: Keep points reachable for inspection and vacuuming rather than trapping them behind permanent joinery.
Every socket should have an individual adjacent switch where the installation guidance calls for it. Test the shutter movement, plug fit and switch action before the plate is finally approved. One well-positioned, shuttered outlet is safer and more useful than several points that force the family to use adapters.
Final Handover Checklist Before You Approve the Bedroom
The last inspection should happen with the room arranged as it will be lived in. Don't approve electrical points while the bed, wardrobe shutters and study unit are still absent if those items determine access. A tester can confirm supply, but it can't tell you whether a phone charger will fit beside the headboard or whether the fan switch can be reached from bed.
Test the room in a fixed order
Enter and switch on: Confirm the entrance controls are visible, reachable and clear of the door swing.
Walk to the bed: Operate the two-way light and fan controls from both sides of the double bed. Check that neither board is behind the headboard.
Lie down and reach: Test both bedside switches and sockets from the mattress, using the actual pillows and nightstands.
Use real devices: Plug in a phone charger, lamp, laptop charger and any planned TV equipment. Check that plugs aren't blocked by the headboard or cabinet.
Test the AC provision: Confirm the dedicated AC point is at the approved location and isn't hidden inside the wardrobe or loft.
Open every cabinet: Run wardrobe shutters, drawers and loft doors fully. Look for collisions with switch plates and plugs.
Check the distribution board: Confirm bedroom circuits are labelled clearly and that the electrician explains which protection serves each planned load.
Photograph the finished points: Take clear wall photographs before final furniture installation. Keep them with the approved electrical drawing for future maintenance.
Handover test: Use the bedroom as a tired person would at night. If you need to cross the room, move furniture or use an extension cord to complete a normal task, the point layout needs another review.
A structured handover day checklist for Chennai home interiors helps keep this inspection from becoming a quick visual sign-off. Record corrections in writing, assign them to the responsible trade and retest after completion. The bedroom is ready when the switches, sockets, lighting and furniture work together without workaround solutions.
Interiors by DeX coordinates space planning, furniture, lighting and bedroom electrical points for Chennai apartments, villas and renovations. If you're finalising your bedroom layout, visit Interiors by DeX to discuss a coordinated design, execution and handover plan before the walls and carpentry are fixed.