DE X INSIGHTS
Profile Light on Wall Design and Setup Guide

You've chosen a fluted TV wall, selected the veneer, approved the paint colour, and saved a dozen inspiration images showing a clean line of light floating across the surface. Then the lights are switched on at night, and the smooth line looks like a row of bright dots, the driver is sealed behind the panel, and one failed component could mean opening up finished carpentry.
A profile light on a wall can look refined and architectural, but the visible result depends on decisions that are mostly hidden. Profile depth, diffuser quality, LED spacing, wall texture, driver access, ventilation, and installation timing all matter more than the product photograph suggests.
Understanding Profile Lighting for Modern Homes
In a Chennai apartment, profile lighting often enters the design during planning for a living room TV unit. A textured wall, simple furniture, and a continuous glow behind a panel can create a strong architectural finish. The practical test comes later: can the driver be reached without dismantling finished carpentry, and will the wall show bright hotspots once the lights are switched on?
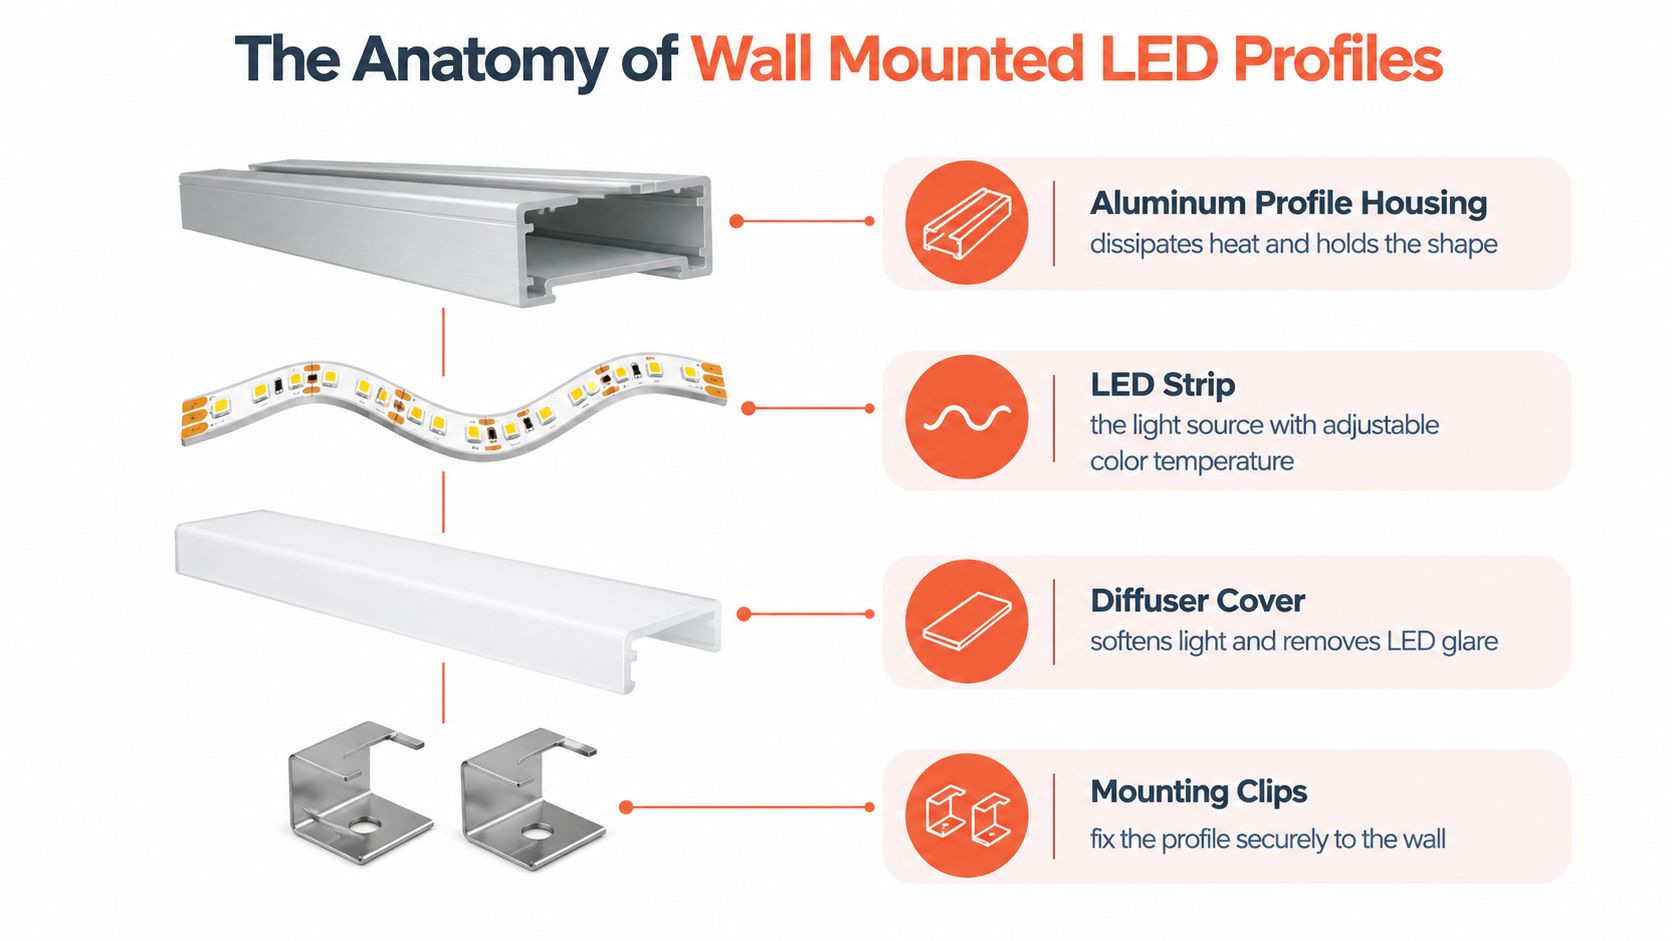
A wall profile combines an aluminium channel, an LED strip, and a diffuser into one linear system. The channel keeps the strip aligned, while the diffuser spreads the output so the light reads as a continuous line rather than exposed LED points. Depending on the wall and panel construction, the profile may be surface-mounted, recessed, concealed, or fitted into a junction between materials. Each option affects installation effort, service access, and how visible the fitting remains.
Chennai also has an established lighting manufacturing base. K-Lite Industries was founded in 1977, and Kompass lists its Chennai operations as producing indoor lights that include wall lights, linear lighting, LED strip lights, and other architectural fixtures. Slim profiles therefore sit within a wider local interest in architectural and decorative lighting, rather than being a short-lived décor feature.
Why a continuous line changes the room
A conventional fitting creates a defined pool of light around its wall plate. A linear profile can underline a shelf, frame a panel, wash a wall, or form a reveal where two finishes meet. Compared with conventional stylish wall lights, it can reduce visual clutter by making the light source part of the architecture.
The direction of the beam determines the finish. Light grazing across a fluted or textured Chennai feature wall will strengthen ridges and shadows, and can expose uneven spacing or diffuser hotspots. A concealed line aimed at a smooth surface gives calmer ambient illumination. A surface-mounted profile remains more visible, but may be the safer choice where opening the wall would complicate installation or future repairs.
Practical observation: Concealment does not guarantee a better result. Keep the light source far enough from a rough surface to control hotspots, and confirm that the driver remains accessible behind the panel.
The same approach works beyond the living room. Bedroom lighting benefits from layers, so these ceiling light ideas for bedrooms can help position wall illumination alongside general and task lighting, rather than treating the profile as the room's only source.
The Anatomy of Wall Mounted LED Profiles
A reliable wall-mounted system isn't just an LED strip stuck behind a panel. Treat it as a small engineered assembly, with each component doing a separate job.
Start with the housing
The aluminium profile housing is the structural backbone. It keeps the strip straight, protects the edges, and transfers heat away from the LEDs into the metal body. Indian supplier listings commonly specify anodised aluminium bodies and profile wall thicknesses in the 1 mm to 2 mm range, with surface and recessed formats available from supplier specifications.
Heat management matters because an LED strip is an electrical component, not merely a decorative tape. If the strip is installed without a suitable metal channel, adhesive can weaken, the strip can sag, and the system can become harder to maintain. The aluminium channel works like a heat spreader on a laptop. It doesn't remove the need for correct electrical sizing, but it gives the LEDs a more suitable physical environment.
Select the strip for the use
The LED strip is the light source. It may be chosen for a warm, neutral, or adjustable colour appearance, depending on the room and control system. For a TV backdrop, the strip should support comfortable background illumination rather than competing with the screen. In a wardrobe, practical visibility takes priority over dramatic grazing.
The strip also needs to match the profile length and the electrical design. Cutting at unsuitable points can damage a run or create inconsistent spacing. A join hidden behind a finished panel is difficult to inspect, so the electrician should mark every connection and leave a clear service route.
Let the diffuser control the view
The diffuser cover sits over the LEDs and softens their output. A frosted or opal cover can reduce direct glare and make the line look more uniform, but it also changes the amount and character of light that reaches the wall. A clear cover may preserve more brightness, yet it can reveal individual LED points when the viewer is close or when the profile is shallow.
The profile and diffuser must be selected together. A premium-looking cover won't compensate for an unsuitable cavity, poorly spaced LEDs, or a wall that sits too close to the source.
Fix the profile without compromising the finish
Mounting clips, end caps, joints, and corner details determine whether the system remains aligned. Surface mounting can be useful on an existing wall, while recessed installation creates a cleaner reveal but requires accurate carpentry, plastering, or panel preparation.
For contractors comparing broader lighting solutions for contractors, the useful questions are not limited to appearance. Ask for the channel material, diffuser type, voltage format, mounting method, cut-point guidance, driver location, and replacement procedure. Electrical coordination should also sit alongside broader electrical protection coordination, especially where multiple concealed loads share a fitted interior.
Choosing the Right Diffuser and Profile Depth
The most common disappointment with a wall profile is not that it fails to produce light. It produces the wrong kind of light. A strip that looks smooth inside a product photograph can project bright points onto a painted wall, a fluted panel, exposed brick, veneer, or a textured finish.
Choose the diffuser according to the viewing distance and wall finish. Clear diffusers preserve a direct, crisp appearance and may suit applications where the profile itself is visible, but they offer less concealment of LED points. Frosted diffusers soften the source and are a more forgiving choice for many residential installations. Opal diffusers provide stronger visual masking and a more continuous appearance, although the exact result depends on the strip and cavity behind them.
Match the cavity to the surface
A shallow profile can work beside a smooth wall when the strip is well spaced and the viewer won't see it directly. It becomes riskier when the light grazes a rough surface. Small changes in the wall plane create small shadows, and those shadows can make every LED point appear more pronounced.
For wall-graze and indirect lighting, deeper profiles in the 18 mm to 36 mm range are recommended because the larger cavity gives the light more room to spread and helps reduce hotspot visibility on textured finishes, as explained in this guide to linear profile lights. This isn't a promise of perfectly uniform light in every situation. The wall material, strip density, diffuser, mounting angle, and distance from the surface still need to work together.
Wall Texture | Recommended Profile Depth | Best Diffuser Type | Lighting Effect |
|---|---|---|---|
Smooth painted wall | Shallow to medium, selected after a sample test | Frosted or opal | Soft line or restrained wall wash |
Veneer or smooth panel | Shallow to medium | Frosted | Controlled glow with limited visual distraction |
Fluted or ribbed panel | Medium to deep | Opal or high-opacity frosted | More even illumination between surface variations |
Rough plaster or exposed brick | Deep, often within the 18 mm to 36 mm guidance | Opal | Broader grazing effect with reduced point visibility |
TV backdrop with close viewing | Medium, subject to mock-up | Frosted or opal | Lower glare and less distraction around the screen |
The depth guidance in the table is based on the wall-graze recommendations for deeper cavities, not a substitute for a physical sample. A sample should be tested at night with the actual wall material, diffuser, strip, and intended viewing angle. Rendered images can suggest mood, but they won't reliably show how a real textured surface will scatter light.
Don't confuse grazing with washing
Grazing places light close to the wall so texture becomes visible. It suits stone-like finishes, brick, and carefully selected fluted surfaces, but it also exposes uneven plaster and poor panel alignment. Wall washing spreads light more broadly across the surface, which is usually calmer for a smooth painted wall or a large TV backdrop.
A trimless or recessed profile can look beautifully minimal and still produce a harsh result. The recess hides the hardware, not the optical mismatch. Before finalising a profile, review the relationship between the strip, diffuser, wall distance, and viewing position. Planning a false ceiling or integrated feature wall also benefits from the practical guidance in this Chennai false ceiling planning guide.
Installation Planning and Maintenance Access
A wall profile becomes part of the building's service network as soon as it is connected to a driver and concealed behind a finished surface. The design may be decorative, but future access is an electrical and carpentry decision.
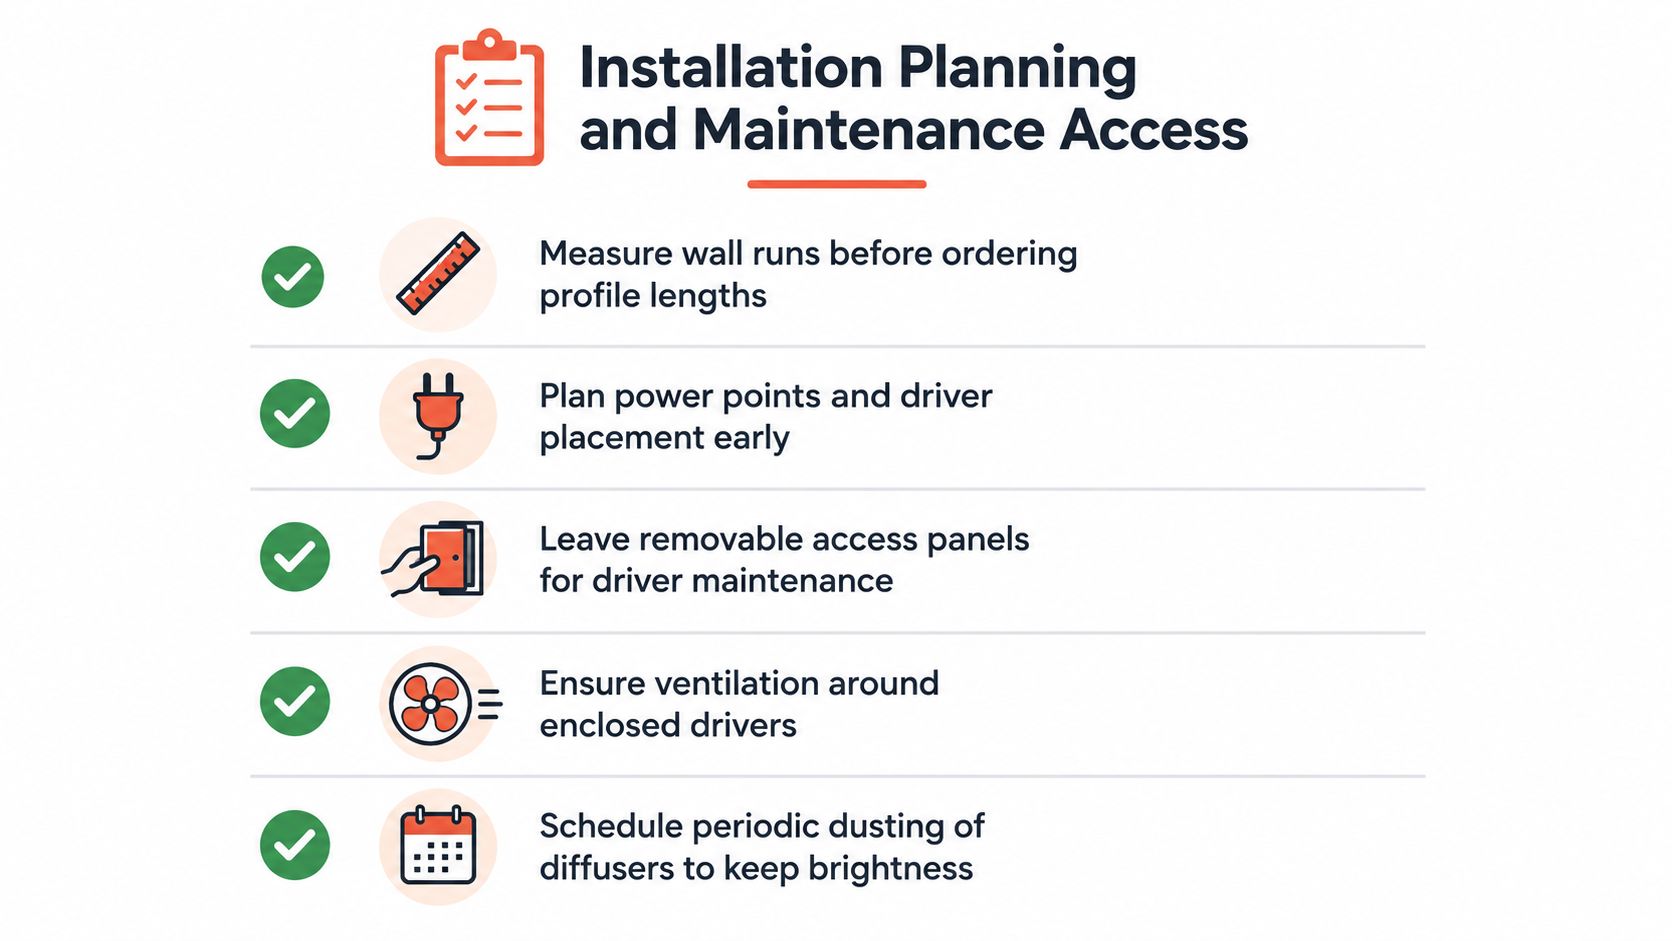
Start with a measured wall drawing. Mark the profile run, bends, joints, power entry, driver position, removable panels, and any locations where the light may be interrupted by shelves or cabinet divisions. Order lengths only after the carpentry and electrical teams agree on the finished dimensions.
Keep the driver serviceable
The driver should remain accessible without dismantling the entire feature wall. A removable panel inside a nearby cabinet, a discreet access hatch, or a reachable ceiling service opening can protect the finished design from invasive repairs. Don't place the driver permanently behind glued laminate, sealed stone, or a fixed panel just because the location is visually convenient.
Allow ventilation around enclosed drivers. A confined cavity can hold heat, and a service space that is too tight can also make replacement awkward. Label the driver, cable route, circuit, and profile zone before closing the panel. That small record can save a future electrician from guessing which concealed component serves which light.
Choose the electrical format deliberately
Indian product guidance distinguishes between 24V DC and 220V AC formats. DC systems are commonly recommended for interior applications such as cabinets, wardrobes, and false ceilings, while AC formats require attention to cut points and waterproof joints, particularly in outdoor-style runs, as outlined in this profile-lighting overview.
For a wall installation, the right choice depends on the run, driver arrangement, control method, and installation environment. The electrician should confirm the load, cable route, driver capacity, switching, dimming compatibility, and protection before the carpenter closes the assembly. Never extend or cut a strip casually at the site because the visible line may become uneven and the electrical connection may become unsafe.
Plan around apartment rules
Chennai apartment communities often set fixed work windows, commonly around 9:00 am to 6:00 pm on weekdays, with shorter Saturday periods such as ending at 2:00 pm or 4:00 pm, and no noisy work on Sundays or public holidays, according to this guide to Chennai society and builder rules. Communities may also request worker ID proof and written approval for structural or common-area-related work.
Obtain permissions before material reaches the site. The Tamil Nadu Combined Development and Building Rules, 2019 require planning permission before regulated development, redevelopment, construction, reconstruction, alteration, or demolition work, and require an occupancy permit before occupation, as summarised in this Chennai renovation guidance. A decorative wall upgrade still needs to be assessed properly if it affects regulated building work, wiring routes, or common areas.
Design Applications for Chennai Residences
The right application depends on what the wall needs to do. A TV backdrop needs low distraction and controlled glare. A living room cove needs broad ambient light. A wardrobe needs visibility inside storage, with maintenance access that doesn't depend on removing the entire cabinet.
TV units and feature panels
A profile behind a fluted TV panel can create a halo effect, but the panel spacing and light direction need careful coordination. If the source sits too close to the ridges, each flute may cast a different shadow and the backdrop can look striped in an unintended way. A deeper cavity, a suitable diffuser, and a mock-up using the actual panel sample can produce a more deliberate wash.
Avoid placing a bright line directly in the viewer's sightline. The light should support the wall, not compete with the television. If the TV unit includes open shelves, use separate switching so the accent line, shelf light, and general room lighting can be controlled independently.
False ceilings and coves
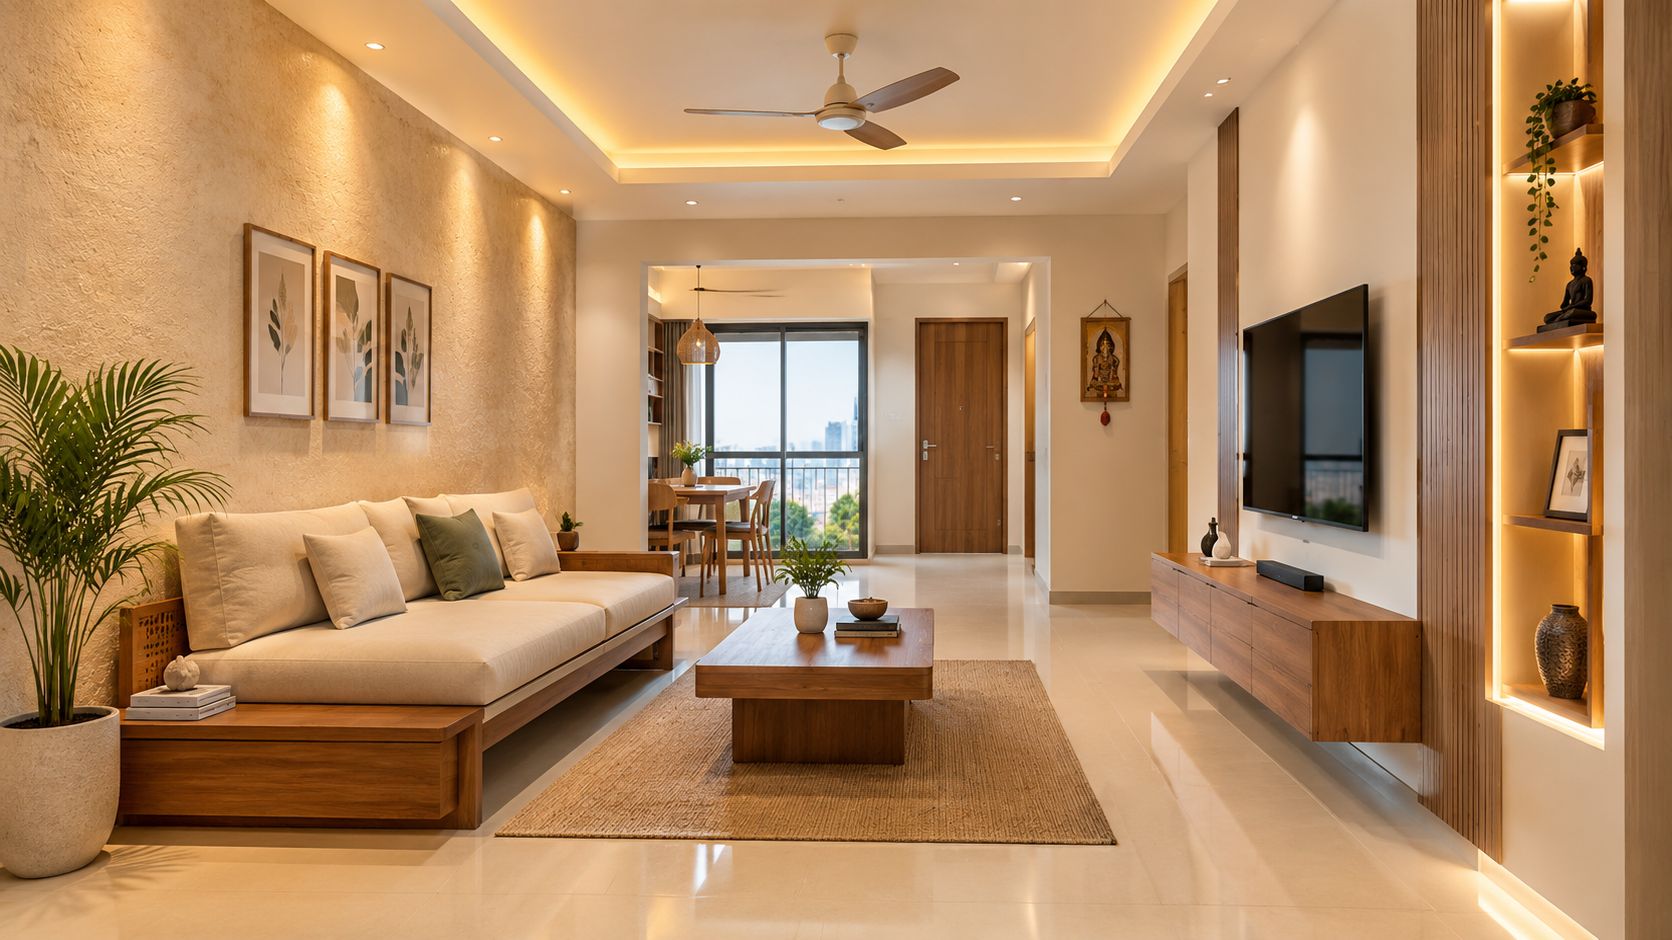
A wall profile can work with a false-ceiling cove to create a vertical and horizontal relationship. The wall line gives the eye a visual anchor, while the cove spreads ambient light around the room. Keep the two circuits separate if you want the space to feel calm during television use and brighter during cleaning or entertaining.
A cove shouldn't become a hiding place for inaccessible drivers. Coordinate the ceiling framing, access points, and cable paths before the gypsum or panel finish is closed. The cleanest visual line is only useful if the electrician can reach the service components later.
Wardrobes and walk-in storage
Inside a deep wardrobe, a profile can illuminate shelves and hanging sections more effectively than a single ceiling fitting. Place the light where opened doors and stored clothing won't block it, and use a diffuser that avoids direct glare when the user looks into the cabinet.
The practical detail is replacement access. A removable top panel, accessible side channel, or serviceable light module is preferable to permanently sealing the driver behind a wardrobe back. For rental or resale homes, simple switching and easily replaceable components may be more sensible than a highly integrated system that requires specialist carpentry to repair.
Tamil Nadu has a substantial local sourcing ecosystem for these applications. As of April 1, 2026, Tamil Nadu had 208 lighting manufacturers, up 3.43% from 2023, and Chennai accounted for 73, or 35.10% of the state total, according to the Tamil Nadu lighting manufacturer listing. That local availability can help homeowners compare channels, diffusers, strips, drivers, and replacement options without treating every component as an imported, one-off specification.
Executing a Seamless Interior Lighting Project
The best-looking wall profile is usually the result of coordination that began before the first panel was cut. The designer decides what the light should do, the electrician establishes the circuit and driver strategy, and the carpenter builds the cavity, alignment, access panel, and finish around those decisions.
Fragmented vendor work creates predictable problems. An electrician may leave the power point in a location that forces an awkward cable route. A carpenter may close the only access to the driver. A lighting supplier may provide a strip that fits the channel but produces visible points on the selected wall finish. Each decision can appear reasonable in isolation and still fail as a complete installation.
Assign responsibility early
Ask for a coordinated drawing that shows:
Finished dimensions: Confirm the wall run after plaster, panel, paint, veneer, and trim thicknesses are included.
Lighting sections: Show the profile orientation, recess depth, diffuser position, and distance from the illuminated surface.
Electrical schedule: Record driver location, circuit identification, switching, dimming, cable route, and spare capacity.
Maintenance plan: Mark every removable panel and state how the strip, driver, diffuser, and connections can be replaced.
Night test: Approve a physical sample in the actual room before repeating the detail across the home.
A single accountable team can manage design development, modular detailing, electrical coordination, site execution, installation, and handover as one connected process. That approach doesn't remove every site constraint, but it gives the homeowner one place to resolve conflicts before they become finished-wall repairs.
When you're collecting references, resources on home lighting design ideas can help you think about mood and architectural emphasis. The execution decision still needs to come from the room's actual materials, viewing angles, electrical layout, society rules, and future maintenance needs.
A profile light on a wall should be judged at night, from the sofa, beside the panel, and from the position where someone will walk past it. If the line is comfortable from those viewpoints and the driver remains reachable, the design is doing more than looking good in a rendering.
Interiors by DeX plans, coordinates, manufactures, and executes residential interiors in Chennai, including wall lighting, TV units, wardrobes, false ceilings, electrical coordination, and final handover. Visit Interiors by DeX to discuss a lighting plan that protects the visual finish while keeping drivers and other service components accessible.